One of the most exciting parts of a new build is the ability to choose finishes – and our builder this time around was even more flexible than our last, which we are so grateful for. It’s one of the reasons we chose to buy from them – it was the most economical way to get a home designed to our tastes, without paying custom-build prices.
Purchasing a new build and/or renovating presents an opportunity to reflect on what didn’t work for your family in your last home and remedy those issues. Whether it’s the layout, flooring, not enough storage space or another issue, you have the chance to start anew. You can see a full tour of our third home, here and read about what made us want to move, here.
We had the opportunity to see a finished version of our exact floor plan, so I knew exactly what we wanted to change to make the home work for our family life and also from an aesthetic standpoint. It was important for us to find a builder that was open to our ideas. Most spec home builders (understandably) aren’t interested in buyers like us – it’s easier for them to select the finishes, make no changes and use the materials they’ve already purchased in bulk for their builds – which totally makes sense from a business/investment standpoint. Many lots in Houston are purchased by investors who buy materials like tile, hardwood flooring and cabinetry in bulk, so they’re not able/willing to make changes for buyers, as they’d lose money/the builds would take longer.
That’s one of the main reasons it took so long for us to buy this time around – we were open to a new build, renovated home (there are plenty of “flips” in our area) or a home we could renovate ourselves, but ultimately, a new construction with a very flexible spec home builder gave us the best of both worlds.
I had been building a home inspiration Pinterest board (here) while we were house-hunting and my builder was able to replicate a lot of the ideas I had saved – it was so helpful to have visuals so we were all on the same page.
OUR WHITE OAK FLOORING
The one thing I did NOT want to change about this home was the flooring – we have not seen any spec home builders in our area install floors as stunning as our white oak ones! (most will not even entertain white oak as they tend to be more expensive per sq. ft. – believe me, I asked!) When I shared snippets of our new home, my DMs were flooded with questions about these gorgeous floors. They are A DREAM! They are easy to clean, don’t show dust, feel great, look amazing (they are a low gloss which I love) and overall just so beautiful.
Here is the info you have all been waiting for: our floors are by Shaw Floors: Castlewood Oak Chatelaine 1010. All info and specs of our floors are available at that link. I highly recommend these floors – they are so much better than any we’ve ever had and I love the color and wide-plank look. If you are building or renovating, consider these – you will adore them. Everyone that has seen our home in person has loved the floors – they’re a showstopper! My builder loves them so much, he and his wife even installed them in their own home.
THE CHANGES WE MADE TO OUR HOME
Below is a list of functional and aesthetic changes I made to our home:
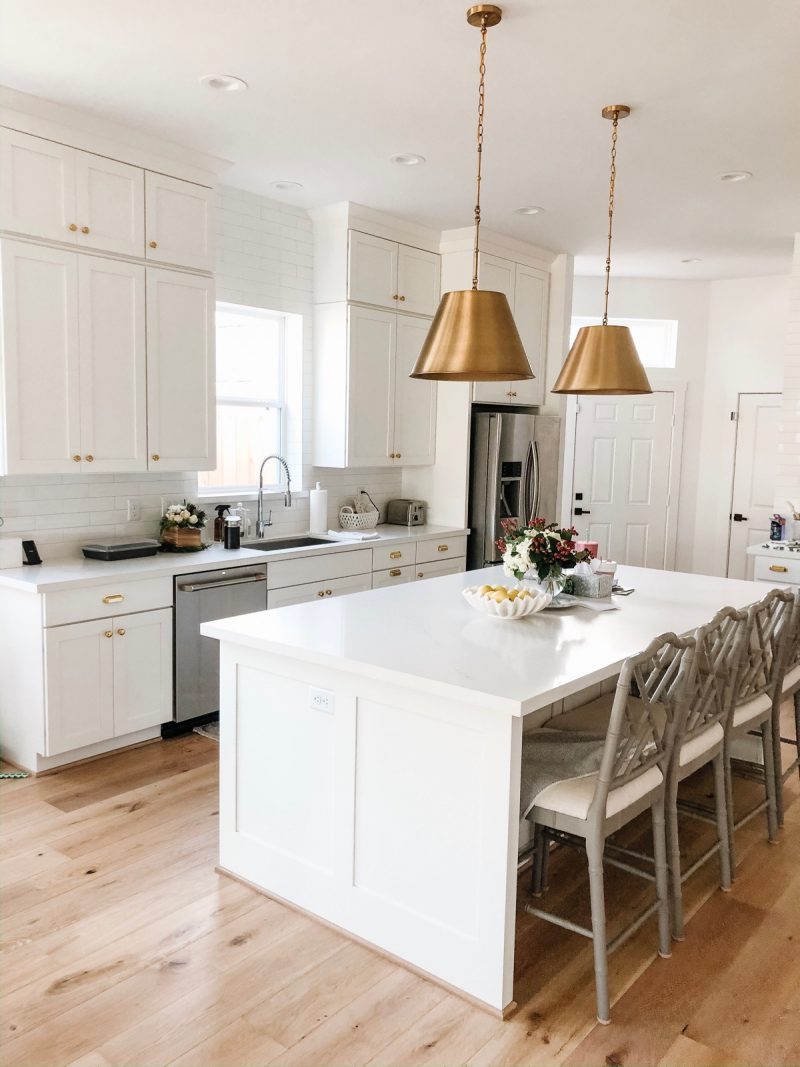
- Doubling the width of the kitchen island and adding the same shaker-style side paneling as our cabinetry (in the builder’s other home with our same floor plan, IMO, it didn’t look wide enough for the kitchen – see what I mean in the images below). By doing this, it allowed us to add an extra row of cabinets along the back of the island where the counter stools go, so it was a huge storage win too! Our builder ended up using my cabinet and island changes in the other homes they were building too, and changed cabinet manufacturers, which I was thrilled with! (Our cabinets are by Wellborn Cabinets – I believe they are this style in the color glacier).
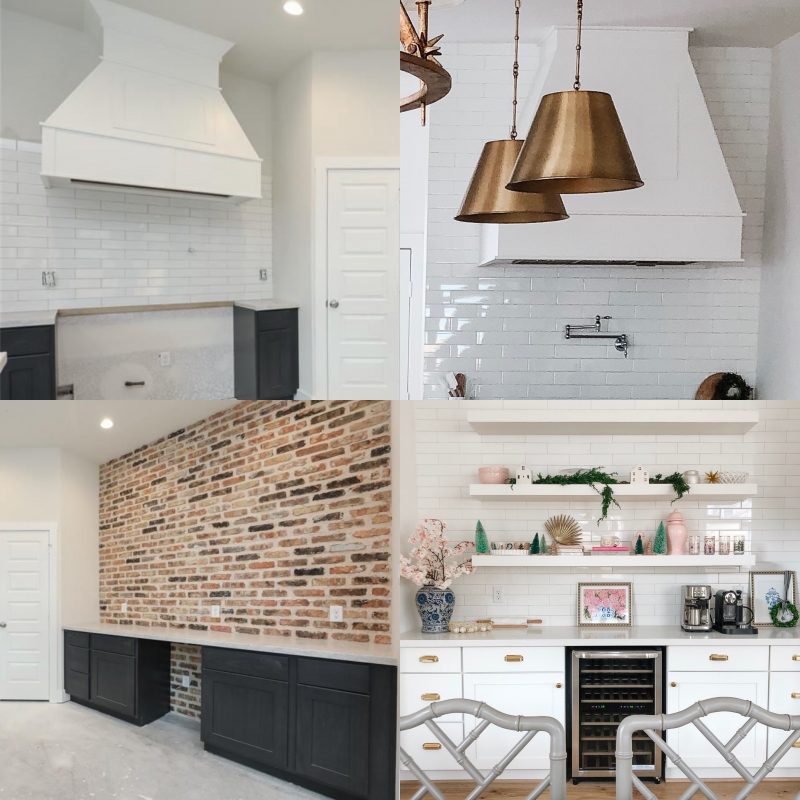
- Bringing subway tile to the ceiling at the kitchen window and framing the window with tile. It just looks more finished when it’s all tiled out, especially since the cabinets go all the way to the ceiling. I selected a light warm gray grout for the subway tile to make it pop a little.
- Adding a row of cabinets to the uppers, so they’d go to the ceiling (this is something a lot of builders skip out on because it costs more, but visually it makes a huge impact – and it’s extra storage too!)
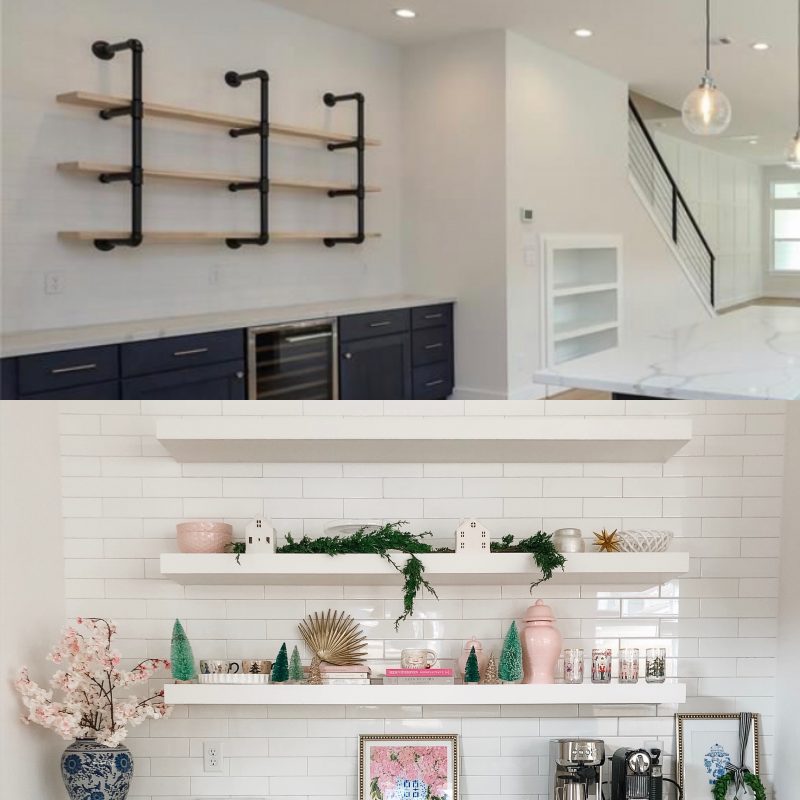
- Having the carpenter build custom floating shelves for the coffee bar/wine fridge area of our kitchen.
- Going to the stoneyard to select my quartz slabs for the entire home (most of them time there are a handful of choices, but I wanted to see every slab in person and have more options). Our kitchen counter tops are Alabaster White quartz, which has a subtle grey veining – we adore them!
- Changed style of kitchen vent hood to my specifications – the carpenter closely replicated a photo from Pinterest and ended up using the design in the other homes they’re building.
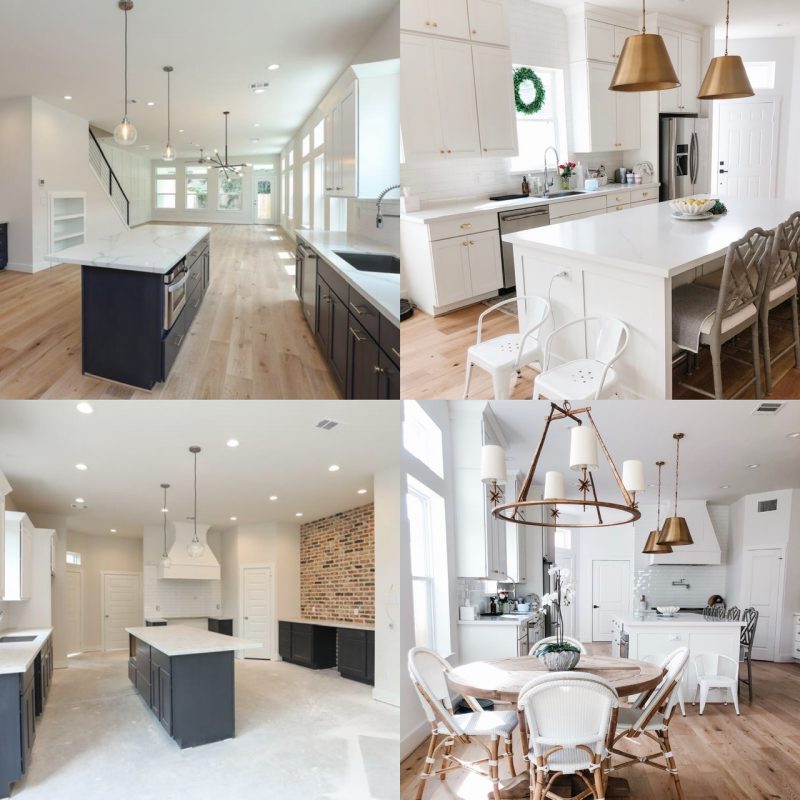
(On the left is the builder’s kitchen in a previous home with our same floor plan and on the right you can see how we expanded the island, added extra cabinets to the ceiling, etc. You can also see a glimpse of the black metal stair railing we changed in our home to have a more traditional look).
Below you can see the wood and pipe shelving the builder offered in their previous homes. It’s too industrial/farmhouse for my style and aesthetic and I wanted something clean and simple. I had so many photos pinned of gorgeous kitchens with white floating shelves and worked with the carpenter to make them the size/thickness I wanted.
- Adding shelving into the storage nook space underneath our stairs. I LOVE that our builder has this storage feature in their homes – it’s such a great use of the space and the shelves are on wheels and pull out! We added some shelves into the storage nook to hold things like photo albums, seasonal decor, etc.
- Selecting ALL tile in the entire home (we paid for upgraded tile in several spaces and our builder let us select from tile they don’t usually offer – I sent photos from Pinterest of tiles I liked and they sourced/procured it for me).
- Selecting paint color for the entire interior and exterior of the home (most builders offer this) we chose SW “Snowbound” for all interior – ceilings, walls and trim -and SW “Alabaster” for the exterior.
- Bringing in all of my own lighting (I still need a living room and game room fixture) – I always say lighting and hardware is the “jewelry of the home” and makes such an impact. I obviously had to pay for all of my lighting out of pocket, but it’s SO worth it to have fixtures you love! Here are some of our fixtures:
- Selecting my own hardware (our builder does not provide cabinet hardware – which worked in my favor as I also chose all cabinet hardware in our last home and know what I like). I purchased our cabinet hardware from Rejuvenation – see my picks here:
- Bringing in all of my own mirrors (I’m not a fan of builder-grade, frameless mirrors and like to find ones that add personality to the space). Builder-grade mirrors are also difficult to remove as they’re glued onto the wall, so you have to fix the sheetrock to get a new mirror – not ideal. We will have the mirrors hung soon and many are ones we are reusing from our previous home. Here are some of our mirrors:
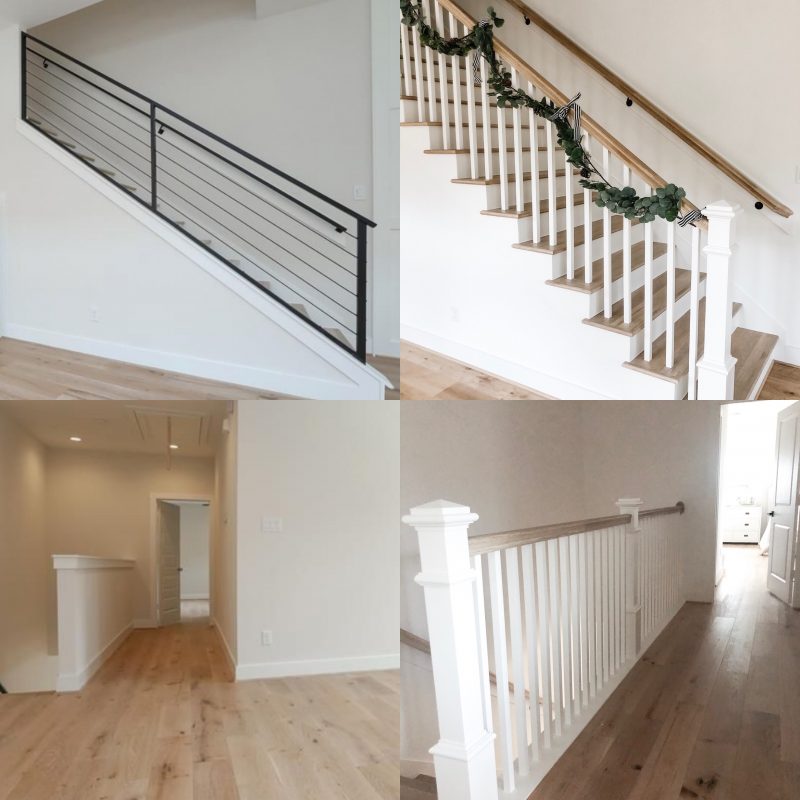
- Changed stair railing design (the other home had black metal railings – too modern/industrial for the look I wanted for the house).
- Removed drywall in upstairs hallway and continue stair railing instead – it feels so much more open and airy this way. We paid for this upgrade.
- Worked with builder’s carpenter to create custom built-ins to my specifications in the game room (a pricier upgrade, but well worth it for the toy-hiding storage and visual impact!) I was able to draw over a photo I took of the game room wall where I wanted the built-ins on my phone and from there, the carpenter drew onto the sheetrock to show me how it would all be trimmed out based on our discussion. It was such a cool process to see the vision come to life!
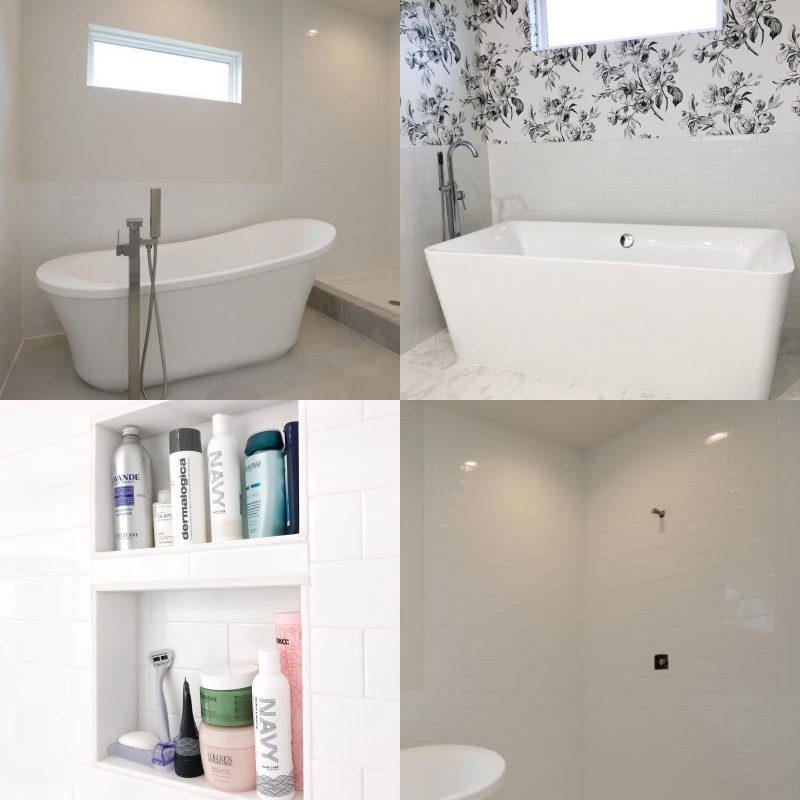
- Added shower niche to master bathroom – if you are building – 100% add this! Our builder doesn’t usually do these, but did it for us. It’s the best way to hold all of your shampoo and other shower supplies!
- Moved bathtub plumbing location – in their previous homes it was right in front of the tub like the image below and I hated it and wanted it centered to the side of the tub (I would have done it at the middle/back of the tub, but they weren’t able to move it there).
- Switch all plumbing fixtures to polished chrome.
- Added shelving in entryway closet for shoes.
- Changed style of all interior doors to two-panel door fronts, including a custom barn door for the laundry room (I’m normally not a huge fan of the farmhouse décor that’s so popular now, but it works for the space since it’s a narrower hallway).
- Added woodwork/wall paneling to entryway to use to hang coats/backpacks.
- Added hanging rack to laundry room for hang-drying clothes (I also changed the style of shelves in the laundry room).
- Added sconces to powder bath.
- Worked with carpenter to plan all of the hanging rods in each closet to maximize functionality (for example, I knew I wanted to put my large dresser into my closet, so we planned for the space based on its measurements).
I’m probably missing a few details, but these are the changes I can think of!
You may be wondering – why buy a house if you have to make so many changes to make it how you want it? Well, it comes down to cost. Building a completely custom home working with an architect and builder is extremely expensive and time-consuming (though I’d love to do that one day too!) It was much more economical to find a builder who would be willing to “work with us” on a home we already loved many aspects of. We didn’t change the layout or anything major. All of our edits, as I like to call them, were aesthetic and/or functional, so they were easier to accommodate than say, changing the placement of a bedroom or moving windows or plumbing around (we actually did have them move the plumbing in the master bathroom to place the bath tub faucet where we wanted it – it was in an odd location in the previous homes).
Our builder was willing to make these changes because I knew exactly what I wanted and clearly presented my ideas, along with photos, which made it easier to accommodate and did not delay the building process (we closed on the date on our original contract).
One of the most important things I kept in mind when making design decisions for our new home is that we needed to build it for OUR family’s needs. Yes, resale value matters, especially since we buy and sell so often, but at the end of the day, it’s not worth it to compromise your needs because the next buyer may have different ones.
One example of this is the shoe closet in our entryway. When I asked for floor-to-ceiling shelves in the entire closet, my builder asked “what about hanging coats?” I asked them to instead add paneling to the wall to create a sort of “mud-room esque” wall where we could add hooks for backpacks and coats. A lot of families don’t wear shoes in their homes (we are a no exceptions household!), so for us, it was important to have a space we could take our shoes off right as we entered our home. The shelves also allow us to add baskets to hold items like sunscreen, bug spray, sunglasses and more, so they’re functional and conducive to our lifestyle. Now that we’re living in our home, I cannot emphasize enough how amazing this closet is – it’s a total game-changer!
On the other hand, some resale value items are ones I felt I could compromise on. We never take baths and I’ve always wanted a master bathroom with no tub. However, you can really lose a large sector of buyers by not having a tub in the master, and since ours is a freestanding tub, I felt it was a selling feature and worth keeping as part of the bathroom design. I actually really like the tub now!
This home really allowed me to continue to explore my passion for home design. I love it so much, that I sometimes wish I had gone to design school to learn the technical skills. I will admit though, that I have total decision burnout after this process. As much as I loved it, I don’t think I can look at another light fixture or mirror for a month, haha.
Ultimately, I love that I had input into every finish, every fixture and well…everything! It makes the home feel so much more special than a typical spec home meant to appeal to droves of buyers, because it’s truly ours, designed for our needs, and reflective of our tastes. We feel really lucky to have found the builder we did – otherwise we would never have gotten a home like this without building custom.
Every morning, I still wake up and feel like I’m in a dream. Our home truly turned out beyond my expectations! Thanks for reading and if you have any questions, please let me know!

Great post! Eventually I would like to renovate my kitchen and plan on using yours as inspiration. Tell me, how did you decide on an engineered wood floor vs solid? Pros, cons? I love the low gloss look!
We didn’t really decide – my builder uses these as their standard floors in their builds – and we loved them and didn’t want anything different. Since my builder installed these in his family’s own home, I also trusted their durability!
Everything is beautiful, Veronika! You made some great changes and choices. Thanks for sharing it with your readers. Wishing you and your family wonderful years together in your new home. Happy New Year!
Your new home is beautiful! I love how light and bright it is. I can’t wait to see how you continue to decorate it!
Congrats on your new home! I recently discovered your blog and love your home. You made beautiful choices. Would you happen to remember the name and size of your subway tile in the kitchen? I know you said “very light gray” for the grout color, is there a specific name?
Wishing you all the best.
What a beautiful home! I’m in love.